Tuesday, 6 September 2011

I'm still here!

So! Life has gotten rather in the way of blogging recently,but I'm still here! just had to take a little break because of some major life changes;one of them meaning I am now looking for a new job at a less then ideal time! I'm sure lots of you are going through the same thing at the moment!

Now for the fun stuff. Here's some  pictures of a few vintage treasures I 've picked up recently.
It's a very drizzly,dull,autumnal day here so  it's been really hard to get decent pics but here goes:

I just love this apron, the fabric is so unusual!
I knew I wanted this straight away. It's so kitch
in a good way I think
My lovely new vintage dress.Actually looks better
on me but will have to wait for fiancee to come
home to take more pics

                                                                 
As there have been quite a few recent additions I hate  to admit that the house is getting just a tad full and fiancee  a bit grumbly at my collecting habits so I have decided to open an Etsy store which will be opening in the next couple of days so watch this space.Here's a little peak at one of the  items I will have in my store:

Original Tala icing set.It's complete and looks like it's never
 been used.It even has the instruction leaflet
More on this in my next blogpost but I can let you know now that I will have bags,dresses,hats,
blouses,belts,aprons,fabrics and a selection of Original Mary Quant tights in packets.

Sunday, 19 June 2011

Me Made Months Practice

I really wanted to take part this time  but I didn't think I'd have enough to wear so I thought I'd have a little practice run. Here's the first outfit I put together. It's all Me Made.(even the knickers) I made the skirt and top when I had only just started sewing so they aren't exactly perfect and I guess I might not choose this outfit if I could wear anything I want but It's perfectly wearable so it should be worn.


I really hate the horrible brown carpet  but the landlord doesn't so we're not getting a new one in a hurry.It actually looks better on the picture then it does in reality.

Tuesday, 14 June 2011

Buttons are here!

I wanted to get these done a little while ago but my printer/ scanner refuses to cooperate so I had to come up with another idea. If you have any more ideas of other buttons you'd like please let me know.I'm really more of a visual person so coming up with catchy phrases etc is really not my thing. I have allready made buttons for refashions 4 and 5 but I'll get those out later. I thought you probably wouldn't be that far yet. I would also like to make buttons for mending and for the all important first step of facing the wardobe clutter.


Should you have any problems using them please do let me know and I'll help.

Monday, 13 June 2011

Some very lucky vintage finds


I've always wanted one of these collar/cuff sets
and was going to make one,
 so you can imagine how excited I was
 to find this in perfect condition unworn in its original packaging.


I just love the green vintage embroidery hoop.


Unfortunatly not in my size but perhaps I can grade it up.
It would make a great basic skirt which I  really need.
I just love the illustration as well!

Friday, 10 June 2011

The history of a gorgeous little hand me down


the bodice is not really that wide ,the coat
hanger is just a bit big for it which is making
it look wider
I  just love this little dress! It's been worn by so many children in the familly.It was bought probably in the early fifties and first it belonged to my mum's cousins, then it was handed down to my mum. She must have worn it in the late fifties Then my auntie came along a few years later probably early sixties by then.it was then passed down to me in the 80's then my little sister in about 98 (my sister is 15 years younger then me and the dress is for a child about age 3 to 4).So this dress has been in use since the fifties and it's still in good condition and it 's now been passed down to me for when I have children.I hope I have at least one girl!

Thursday, 9 June 2011

Refashion/cardigan to vintage style top

I really like the rushed front

the back


I've had this cardigan in my major overhaul pile for ages. I didn't like the shape of it and  it was way too tight unless I wore it with something really thin underneath so I refashioned it for Make and Mend 2011 which I'm doing in addition to my own refashion Make Do And Mend Wardrobe Refashion I'm pretty happy with the outcome.I thinks it's quite cute. It does stay up on it's own although I might add straps later but I'll see if I really need them.

Wednesday, 8 June 2011

Just a teensy change on the dress + another mend = a new outfit


This dress was on my major overhaul pile for ages because it was rather loose at the waist,it has a little stain at the front and the bow made it hard to accessorize and I wasn't sure about the colour either.I thought it really needed a major refashion and was planning to take it apart completly although I did wear it occasionally.

Then I fixed the little red belt for make and mend 2011 It had been on my mend pile for about a year as I was unable to find the red leather needed to fix the little slide that holds the belt shut,As it's quite a long belt this was actually needed as it was unwearable without.In the end I mended it with some red ribbon which matches the colour very well.

So I tried the belt on the dress and it looked pretty good.The skirt doesn't do the bunching thing on me as it does on the doll.but it still didn't look right so I took the bow of and added the flower brooch instead. Much better! I kept the little bow and sewed it on a pin so I can still use it when I want.

I would have liked to have taken pictures of me in it but that would have meant waiting for my fiancee to come home but I'll do some later.I take all my pictures with my mobile which has only a basic camera.


Tuesday, 7 June 2011

Thank God I finally finished the pattern! My back is killing me!


Without a french curve and only a ruler this was really hard work and half way through I hurt my back pretty bad and had to stop for a bit. The kitchen table really isn't the ideal height so I relocated to the kitchen work top.A bit cramped and always in danger of getting the pattern wet but the height is better and I managed to carry on. I also faffed about quite a bit deciding how I wanted to finish my seams and therefore how big the seamallowances needed to be. Some of the lines of the curves are not perfect and this bothers me,I hope this won't affect the hem too much,but It's done!

Monday, 6 June 2011

Why don't I just do both!

My first repair for make and mend. The bias binding had come away in places and I also added bust darts for a better fit.It's an apron but I do sometimes wear it as a wrap dress

A couple of days after I started Make Do And Mend Wardrobe Refashion New Vintage Lady also started her refashion  Make and Mend. now for a little while I wondered What to do. I wanted to do my own but hers sounded good too and Make and Mend  is a short term project whereas mine is longer term so I decided why don't I just do both! Hope it doesn't get too confusing for you! New vintage lady's refashion also focuses more on repairs so both projects could be done simultaneously and It would be quite nice to get a badge for doing this. I don't know why but it motivates me to get badges and there's certainly no shortage of repairs to do..
I am also making badges for my Make Do And Mend Wardrobe Refashion. My computer is failing to find my scanner so these are a bit delayed but they are coming. I will also start a flickr group if there's a need for it.

I won!

I'm so excited to have won this lovely bra pattern PDF from Anna at A few Threads Loose. Anna blogs mainly about vintage patterns. She also makes some beautiful things and she has an etsy shop ful of gorgeous patterns
Thank you very much Anna.

Sunday, 5 June 2011

I've hit a snag! so a slight change of plan

I was just finishing my seam allowances this morning when I realised that the fabric from the red dress just wasn't quite big enough as the front of the skirt is in one piece. I could change the pattern but I don't think it would look right if it was in 2 or more pieces because it wouldn't match the bodice so I decided to change fabric instead.After having a look in my stash I decided on the red polka dot.I have just under 2 metres of this which is just about  enough.The zip still matches but I'm wondering about whether to change the thread or not as it's just a little to light for this.

Thursday, 2 June 2011

Scarf to bag in seconds/no sewing required

I didn't invent this. Well I did, but as it turns out  my way is pretty similar  to an old japanese way of carrying food and other stuff I imagine too. You can use this for anything really but be careful with books as the edges might damage the scarf if it's quite thin.

Wednesday, 1 June 2011

The red dress so far

So as usual I've grossly underestimated the time things take to make. Do you do that? Think oh that looks quite simple! I could whip that up in a few hours! 4 days later ....

My project bag.one of my earliest refashions.

 I have unpicked the red dress. I don't mind unpicking because you can do it anywhere: I take mine to the park if the weather is nice but more usually I do it in the evenings while we watch something on the I player. well I listen to the i player and my fiancee watches.

I  copied my pattern from my dress It took me a little while to figure out how to do it best but I got there in the end.I did it like this:turned dress inside out,pinned it and copied stitching line. This sounds simple but the hard part was working out how to manoeuvre the garment so I could get to the whole thing.the top has elastic so I had to sort of pin that to the ironing board to stretch it.


I washed and pressed my fabric.

I had to buy a zip for this  and some thread I didn't have anything in my stash but I found a nice little fabric shop near to me which sells all sorts of lovely things including lots of different colours nets.buttons,silks I have lived in the same house for years but somehow never spotted the shop. I doesn't look great from the outside which is probably why.

I tried out different threads I have been having some difficulty with some of my thread leaving a sort of hard scratchy edge. So I really don't want this especially on the bodice as I know this would spoil the garment for me. the trouble is the only thread I could find which felt quite soft is the sort of fluffy cheap kind and it's also polyester. The man in the shop recommended it. I am getting quite confused about thread choice now because everyone seems to say something different. Is polyester thread OK on cotton? In the end I might just have to get  started and hope for the best.


I wondered whether or not to do a muslin.perhaps not necessary here.I cut one out and basted it together.

I did a major sew area reorganise.Sort of  neccesary ,but  procrastination really.
Seeing it all written down I can see why it's taken me a little while longer then I thought originally. I guess it is quite a lot of stuff to do really. I haven't even started cutting yet. and actually I need to do finish off seam allowances on my pattern.


Thursday, 26 May 2011

So I've been getting a bit distracted ....But back to work and with a new name...I'm going to call it the Make Do And Mend Wardrobe Refashion anyone care to join me?

This dress fits really well so I've taken a pattern from it
What with Sew mama Sew give away day who wouldn't be distracted.But  I'm now really getting back to the job in hand. I'd like to join some other sewers doing wardrobe refashions so have been looking around for people to team up with. If you know anyone doing something similar or who wants to do something similar please let me know.

 I've decided a little while ago that I'm really going to try not to cheat to much with this wardrobe refashion. In my ever growing library I have a copy of make do and mend, I read it all ages ago and when refashioning it suggest that you should unpick the clothes,wash and press them and then take your pattern and cut it out of the fabric.This didn't make any sense to me a couple of years ago when I could think of so many short cuts but right now after a few projects where although I certainly had success with a good few some of these things just aren't quite right so I'm going to do things properly this time wherever possible.
 So  I'm renaming my refashion the Make do and Mend wardrobe refashion.

The idea was to use existing clothes i love in my wardrobe,take patterns from them and use them to remake clothes I don't love so much.and off course use anything else you have lying around as well.fabric,notions etc,Would anyone care to join me?I'm also intending to make more homeware and accessories from my old clothes and scraps so any beginner seamstresses need not feel left out.

Just a bit too dirndl. The dress I'm refashioning at the moment. i do kinda like it but It doesn't look too good on me making me look like an extra in the sound of music and not in a good way!


I'm not real crazy about too many guidelines so I'm going to keep them kinda flexible but this is what I have in mind.

  • You can use anything you have in the house or can get from from friends or family.You could get friends and family to donate clothes for you to take apart if you don't have many.
  • It is fine to buy zippers,buttons,fabric etc as long as this is in order for you to make use of something you allready have but only after you've checked to see if you could use something  in your stash or could get hold of something for free, perhaps taking old clothes apart for the buttons and zippers.
  • You should try to use free patterns where possible either taken from the clothes you allready have.or things you have in your stash or maybe you could swap traced patterns with other sewers.or perhaps from burda.Be creative!
  • I do really want to keep a vintage feel to this so I'm thinking using vintage clothes to take patterns from,using vintage or vintage style patterns.drafting your own vinatge inspired etc.Although more modern refashions can be nice to I'd like to keep this vintage inspired.
  • Anyone can join and leave at any time.It's not a fixed time project.whether you  only want to do one refashion or a whole wardrobe.
The idea is to make your wardrobe better using the least amount of money possible. I started doing this because I had more clothes in my wardrobe which didn't fit or suit then ones which did, a small budget, and also lots and lots of things bought second hand with refashioning in mind which I never quite got around to. I'd like to end up with more clothes which do fit and suit me and less which don't

Wednesday, 25 May 2011

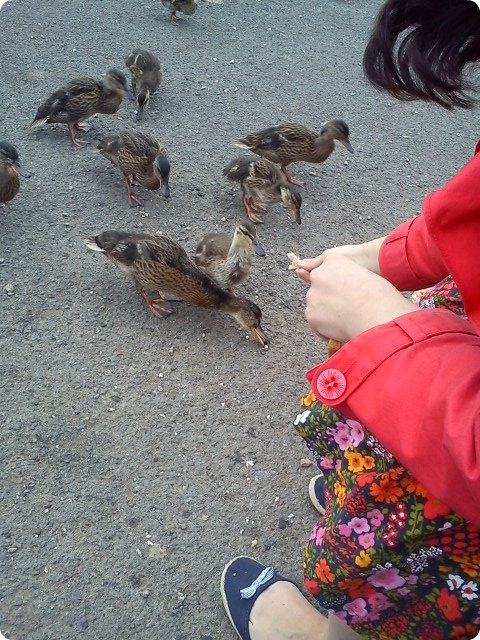
A little break from sewing and some really cute ducklings

We were just about to leave the park and didn't have much bread left when some ducklings appeared were I had left some bread earlier It didn't take long before there were loads and one even ate from my hand.


Teenage ducks all lined up

This little duckling ate from my hand.

Soon there were lots of ducklings

The little one was eating from my hand


Tuesday, 24 May 2011

A few more fabric scrap creations


Jewellery pouch made from a teensy bit of 2 different coordinating t shirts


Mobile phone cover made from a bit of jumper leftover after I made 2 cushions and some legwarmers out of it and a scrap of t shirt. It actually looks much nicer in reality but somehow doesn't look great on photo.


The accidental softie: I was intending to make a cat toy and really quickly and badly whipped this together just to test the pattern i made but as I put the face on it really started to look cute so I put some more (this time deliberate) bad stitches on and finished it. I think it really has charachter. If I do make a cat toy in the future I'll remeber not to put the face on it.I couldn't bear the tought of a cat hurting my poor little softie mouse

Monday, 23 May 2011

Wardrobe refashion so far

After taking the dress I chose to be my pattern to bits and making the pattern I realised it was a little more complex then I had anticipated and i really wanted something simple as I wanted to use it as the basis for my wardrobe refashion so I needed to be easy enough to make variations so I decided to take a pattern from one of my favourite dresses as well as it's fairly simple. This is the dress


So far I've copied the pattern from the dress and have started to copy it onto my grid paper.I am working  on the muslin and am washing and pressing the different fabrics I'm going to use.
I'm feeling very pleased with myself as I'm resisting the urge to jump right in and cut corners. I really want the finished product to be something I can love for years to come and I it's so nice when something is made with care and attention to detail.


This is the dress I've chosen to start my wardrobe refashion with. I love the fabric and the ric rack trim but to be honoust it's a bit too dirndl which means I rarely wear it.and it doens't fit well in some places.I 've nearly finished taken it to bits.There's heaps of fabric in the skirt so I should have enough for my dress with a bit left over for accessories.

Thursday, 19 May 2011

No more wardrobe refashion for today but just a little bit of sewing with scraps


I made this mobile cover from some tiny bits of leftover fabric in my bit bag.
I really like how the fabrics work together.In the past I have just made it up as I go along but I'm trying to be patient and make the pattern so I can make it exactly the same again again.I'm thinking this would be good for presents.
The camera on my phone is annoying me though,It can't white balance it and it has started turning all the whites grey suddenly so I have a blue back ground today.

Monday, 16 May 2011

Easiest ever flat bread

A couple of days ago I wanted  some chapatis to go with a curry I had made but I didn't have the right ingredients so I started to experiment with what was in the cupboard. What I found was that you can make flatbread with just flour and water and this is perfectly ok.off course I wanted to experiment with this so I also made a version with yoghert and honey, this was really nice and kept the flatbread  softer.Just milk and flour works well too. A pinch of salt helps but isn't essential
so here's what you do for the basic version. any other versions are just variations so you can use what you have.


basic recipe:

Flour(self raising is better but not essential,It will make it nice and puffy)
water

put about 2 cups of flour into a big bowl, slowly add water and stir with a big spoon.The dough will come together very easily. when it is to difficult to move your spoon around start kneeding your dough .you will need to keep adding a little bit of water until you have a nice little ball which isn't sticky.if you have added too much water just add a little more flour.It's pretty obvious when you have the correct amount. You won't need to kneed it much .You can add a pinch of salt too if you want to.

Devide your flour into small chunks and roll them until they are round.

Put a a little bit of flour into a small bowl and use to coat the dough balls,shake of the excess.

Put a frying pan on the fire with a tiny amount of oil or fry light.this needs to get hot before you can add your flat bread.

Roll out one of your balls as thin as you can manage.You can use a bottle of tall glass if you don't have a rolling pin.you might have to add a little more flour to stop them sticking.

Pop you flat bread in the hot pan. This will just take a few minutes.

Make sure you give your pan a wipe with a bit of kitchen towel in between putting your flat breads in.This will prevent the flour from sticking to your pan and ruining it.

Serve with soups,curry,toast and serve with preserves or honey or wathever else you can think off.

Saturday, 14 May 2011

I'm loving the graph paper! So much better then pattern making paper.

Canson Graph paper 75 cm by 10 metre
So the graph paper I ordered from amazon to try instead of pattern making paper arrived surprisingly quickly.I think it was the following day so I was very impressed.I much prefer it and I think it's better then pattern making paper so I thought I'd post about so you can all try it too if you want. It's milimeter paper which is fantastic,It makes making patterns so much quicker and more accurate then the cm paper particularly if like me your ruler isn't quite straight any more through using craft knifes. It comes in a tube which is handy for tidying away and it's great to have a big roll because with the small sheets you seem to run out so quickly.It's £15.20 plus £1.99 delivery from Amazon.